

Now having shared with you all how to connect Flodesk to WordPress. And three reasons why you need a mailing list today. Today I’m going to talk you through how to create an awesome automated welcome sequence in Flodesk.
Oh, just a FYI. If you haven’t yet joined Flodesk, then this link will give you 50% off your subscription!
WHY HAVE AN AUTOMATED WELCOME SEQUENCE?
Well because who wants a manual one? Think about it. You’ve created a beautiful form to sit on your website because you’re looking to grow your mailing list and newsletter subscribers. (If you don’t know how to create forms on Flodesk then check out this blog post here). You don’t want to be manually sending an email every time someone subscribes. Who has time for that? An automated welcome sequence not only looks more professional. But it’s incredibly easy to set up. Plus your subscriber feels connected to your site right away.
SO, HOW DO YOU SET UP AN AUTOMATED WELCOME SEQUENCE?
By using Flodesk of course! And I’m going to use this blog post to break it down step by step. So that by the end you’ll feel confident to put together a three email welcome sequence that includes:
- A welcome email introducing yourself and how your audience can connect with you
- The resources you can offer your new subscribers
- Any paid for services you can offer your subscribers
Are you ready? Then let’s begin!
STEP ONE: CREATE A NEW WORKFLOW FOR YOUR WELCOME SEQUENCE
So to do this you need to log into your Flodesk account. And click the WORKFLOWS tab. From here you can either choose to create a new workflow, or pick one of the templates. For this tutorial, we’ll go with CREATE NEW.

STEP TWO: CHOOSE A TRIGGER FOR YOUR WORKFLOW
So the first thing we need to do with our new workflow is choose a trigger. The trigger will quite literally trigger the workflow and sending out your first email. So to add a trigger, just click ADD TRIGGER. Every trigger will start with someone being added to a segment. Now a segment is just a group of subscribers, but you can put them into segments to make it easier to know where they’ve joined form. For example, you might have different forms on your site. Equally a segment could be different parts of your audience that you choose to separate so that you can serve them better with different emails.
If you want to create a new segment then you can just start typing the name of your segment and click the CREATE option. I’ve called mine NEW WELCOME SEQUENCE.

STEP THREE: ADD YOUR FIRST EMAIL TO THE WORKFLOW
So to add a new email to the workflow, you just need to click the + button underneath the trigger and choose the email option.
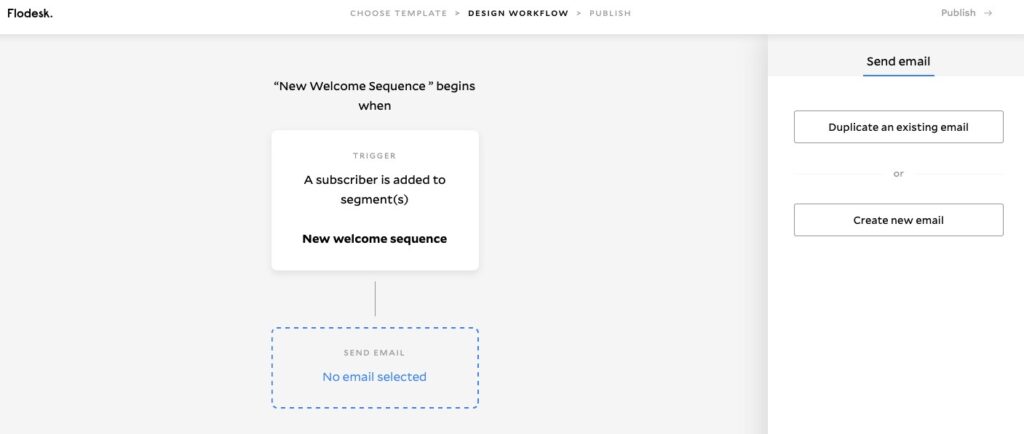
You can either at this stage choose to duplicate an email you’ve already created. Or start from scratch with a new email.

STEP FOUR: CREATE YOUR INTRODUCTORY EMAIL
The next step in creating an awesome automated welcome sequence in Flodesk is to CREATE NEW EMAIL. You can then choose one of their beautiful templates to customise or you can start from scratch. I personally love to use their templates as they’re incredibly easy to customise and make your own.
Now to customise a template, you just need to click on any of the text boxes or images and work through the editing options. You can upload your own images and logos. You can use your own brand colours. And just generally make your email, your own.
If you’re not sure what to include in that introductory email, here are some of the things I like to include:
- Take advantage of the automation and address the subscriber by their first name for that added personal touch.
- Introduce yourself and tell your subscriber what you do. And add in a picture of yourself so they can see what you look like
- Let your subscriber know how often they can expect to hear from you. Is it going to be weekly, monthly, just when there’s something exciting to share?
- Include links to other places where they can connect with you. Can they find you on Instagram, on Instagram, on a Podcast etc?
- And then at the end of your email, invite your new subscribers to reply and introduce themselves.
- Don’t forget to customize your social links and business address at the bottom of your email. You’ll only have to do this for your first email, then Flodesk will automatically add the information to future emails.
STEP FIVE: CHANGE THE SUBJECT LINE FOR YOUR FIRST EMAIL
So now your first email is ready, you need to click the FINISH button in the top right. Then in the email preview on the right sidebar, scroll down to the Subject Line area. Here you can customise your subject line.
STEP SIX: ADD A TIME DELAY TO YOUR WORKFLOW
Now you don’t have to do this step, but personally I think it’s best practice to wait a day or two before sending the next email. So click the + button underneath your first email. And choose TIME DELAY and enter your preferred time delay that Flodesk should wait before sending the next email.
STEP SEVEN: CREATE YOUR RESOURCES EMAIL
Just like before, click the + button underneath your time delay and choose Email. Then click Create New Email and choose a template or start from scratch and then create your resources email.
If you’re not sure what to include in your resources email, here are some of the things I like to include:
- Share links to content that the audience in that segment are going to find helpful or interesting.
- You want the email to serve your audience by providing value that is true to what you stand for and your band
- Ask them to respond to your email with any action they might have taken from the content you shared
And don’t forget to change the subject line!
STEP EIGHT: ADD ANOTHER TIME DELAY
You can now add another time delay to your workflow. Again, you can ask Flodesk to wait two days before sending the next email. Just follow the same steps in step six.
STEP NINE: CREATE YOUR PAID OFFER EMAIL
So this is the last email in your three part welcome sequence. In this email you can tell your subscribers about your paid service or product offer. Just follow the same steps in creating an email So clicking on the + button underneath the time delay and choose to create a new email. Pick a template and away you go!
If you’re not sure what to include in your paid offer email, here are some of the things I like to include:
- Keep this email short but to the point, the goal here is to have your subscriber click the call to action button
- Be authentic! Tell your subscriber how your product/service will solve their problem and provide much needed value
- Consider including a couple of customer testimonials in this email
Once again, don’t forget to change the subject line after you’ve finished your third email!
STEP TEN: IT’S TIME TO PUBLISH YOUR WORKFLOW!
So you’ve finished all three emails, now it’s time to publish it. Just click the Publish button in the top right and follow the steps until it’s published!
So there you have it. You’ve just created an awesome automated welcome sequence in Flodesk. Let’s look at what you’ve got. You’ve created
- A trigger for when a subscriber is added to a segment
- Your first email – which Flodesk will automatically send
- A two day time delay
- Your second email – which Flodesk will automatically send
- Another two day time delay
- Your final email – which again Flodesk will automatically send
Congratulations! That is an awesome automated welcome sequence in Flodesk that now that it’s created. You can just sit back and leave Flodesk to it. If you want to edit it you can. You just head back to the Workflow area of Flodesk. Click the edit button and make your changes. Just note that when you edit a workflow, you do pause it. So it will be temporarily on hold while you make any changes.

Leave a Reply